MANAGING MOISTURE IN WALLS
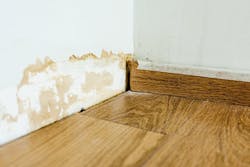
A fundamental truth about wall construction is that, at some point, walls will be exposed to moisture, so they must be designed and built in a way that allows them to dry ... or likely suffer significant latent damage that’s both time-consuming and costly to remedy.
How Walls Get Wet
There are four common ways walls get wet:
1. Bulk water from exterior rain or snow events or from an interior plumbing leak or a poorly installed tub/shower assembly.
2. Moisture vapor infiltration caused by air pressure differences due to wind, stack effect, or mechanical systems that force air (and moisture with it) through incidental holes or gaps in the wall assembly, which have the potential to cause condensation.
3. Moisture vapor passing through permeable layers of a wall assembly, which depends on a material’s permeability and the tendency for moisture vapor to diffuse from wetter to dryer areas.
4. Capillary action that occurs when moisture saturates porous materials and that moisture continues to travel through the material until it runs into an impenetrable barrier, referred to as “capillary breaks.” Cementitious materials or stone materials do a great job of storing moisture and releasing it as vapor into the air. However, wood doesn’t like being wet, at least not for extended periods. The combination of wood with sufficient moisture is a great recipe for mold growth.
READ MORE: ALLERGY AND ASTHMA EXPERTS TALK HEALTHY HOMES
Strategies for Managing Moisture
To manage bulk water, fix the source of the leak or breach. After that, a well-installed weather resistive barrier (WRB) is critical, and all flashing components at windows, doors, and penetrations must be installed with keen attention to detail.
Parapet-wall caps and recessed windows or pot shelves require the additional protection of a waterproof membrane. A WRB is intended to shed bulk water, but it can’t be waterproof because it must also be vapor-permeable.
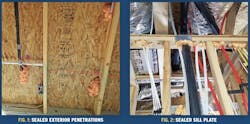
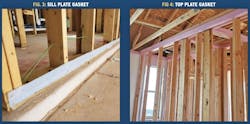
To manage vapor carried by airflow, make wall assemblies as airtight as possible using redundant air-barrier strategies: use top-plate gaskets (Fig. 4) for all interior and perimeter walls, and sill-plate gaskets (Fig. 3) for the latter; caulk all penetrations through the plates, chases, and drywall (Fig. 1 and 2); and foam-seal openings at the back of electrical boxes.
On exterior wall surfaces, install a WRB, sealing all penetrations through the material with its specified sealant or tape. Ensure all windows, doors, and other penetrations are integrated in a shingleflashed fashion with the WRB. Finally, seal all of the seams in the WRB with tape or fluid-applied membrane.
It’s also a good idea to manage the air pressure within the building enclosure with respect to outside. Basically, you want the greater pressure to be on the cooler side of the walls to avoid condensation. In heating climates, create slightly negative pressure using an exhaust ventilation strategy; in cooling climates, pressurize the interior with a dilution strategy.
To manage vapor diffusion, study building science regarding the propensity of condensation to occur under specific conditions. As long as water vapor passing through the wall doesn’t come in contact with surfaces that are cooler than the dew point of the air, it will continue to move through the wall assembly without causing harm.
Finally, use capillary breaks between all materials that store water and materials that don’t like being wet for extended periods of time. Even cementitious sidings should be isolated to reduce swelling and paint blistering.
Graham Davis drives quality and performance as a building performance specialist on the PERFORM Builder Solutions team at IBACOS. Read the full text of this article here.
This piece first ran as part of Pro Builder magazine's Quality Matters column.


