How to Prevent Squeaky Floors
When was the last time someone gave you credit for building a floor that didn’t squeak or rattle the china cabinet? Probably never. Some things are just expected in a new home. A buyer wouldn’t thank you for providing working windows or running water; same with a solid, quiet floor. If it ain’t broke, don’t mention it.
Which is kind of a shame, given that delivering a floor that doesn’t squeak or bounce requires some thoughtful engineering and the use of advanced materials and methods. It may not be rocket science, but it is building science.
Push the limits of span and spacing at your own peril: Chances are the finished floor won’t feel good underfoot, even if it meets code.
The good news is that there’s ample evidence and documentation about the right way to build a floor system that will leave your buyers speechless. And the materials and methods prescribed continue to evolve to improve floor performance. To wit, 2x10s have been replaced with engineered I-joists; plywood with OSB specifically engineered for subfloors; and nails with screws or serrated fasteners; as well as the use of adhesives, joist hangers, and handy fastening patterns stamped on subfloor panels—all for the sake of creating a more stable floor frame.
These new-age innovations enhance the old-school rules of proper joist span, depth, and spacing by limiting the number of framing members, fasteners, and hardware needed, in turn mitigating the potential for squeaks and deflection.
And please let’s forget about code-minimum. Push the limits of span and spacing at your own peril: Chances are the finished floor won’t feel good underfoot, even if it meets code.
Installation Tips for Improved Floor Performance
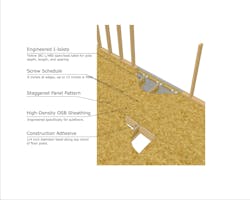
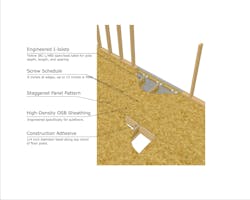
A quality-built floor system is likely to be a bit more expensive and time-consuming to build (at least the first few times) compared with a conventional code-minimum assembly, but at least you won’t hear about it from the homeowners after move-in. The illustration (above) and checklist that follows below offer some tips to help protect your profits and reputation for quality.
Staging
To avoid incidental moisture and other damage, keep all materials protected from weather before installation, or schedule just-in-time delivery.
Design
Use the code-plus L/480 span and load tables from the International Residential Code (IRC) to determine the right combination of joist depth, length, and on-center spacing that will mitigate deflection.
1. Joists: Engineered-wood I-joists come at a cost, but they’re far more dimensionally stable, offer longer spans, and don’t have a crown.
2. Subfloor: High-density OSB sheathing specifically engineered for subfloors offers moisture resistance throughout the panel and holds fasteners better.
3. Panel pattern: Stagger the panel joints so they don’t run along the same joist length; leave a 1/8-inch gap at all edges, which most tongue-and-groove joints
already allow.
4. Glue: Make sure the surface is dry and free of dirt; apply a continuous bead of ¼-inch-diameter solvent-based construction adhesive along the top of the joists; only apply glue for one to two panels at a time; also apply glue to the tongue-and-groove panel joints.
5. Screw: To fasten the deck, use screws, not conventional nails, centered into the top of the joists to ensure a complete connection. Follow a schedule of 6 inches on-center at the panel edges and up to 12 inches on-center in the panel field.
Inspection: Walk the deck to inspect it before applying a finished floor surface.
Glenn Cottrell is managing director of the Builder Solutions team at IBACOS.

