Home builders are increasingly turning to technology to work smarter, faster, and more efficiently, to stand out among the competition. For an increasing number of them, this transition entails moving from two-dimensional (2D) drawings to three-dimensional (3D) digital modeling.
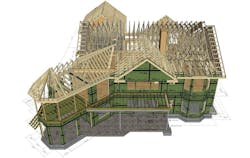
In a 3D environment, flat plans are brought to life, making it possible to visualize and understand precisely how a home’s design will come together. As such, builders can greatly reduce the typical communication challenges they face coordinating projects among clients, engineers, architects, contractors, site crews, and other stakeholders. The 3D model simplifies communication and ensures everyone is on the same page throughout the project design and development.
But perhaps the greatest benefit of a 3D model for a builder is that it makes it possible to identify and remedy costly problems before construction begins. That’s what piqued the interest of John Brock of BrockWorks, a custom home builder in Hardy, Va., and eventually drove him to explore 3D modeling and startup Constructability 3D to serve other builders and housing professionals.
RELATED
- Tips for Using 3D Digital Models to Visualize and Sell Homes
- Tech Tools for Builders: Mobile Apps
- See Change: Innovation in Home Building
The Path to 3D Modeling
Brock began his career in housing more than 30 years ago, drawing at a drafting table before graduating to AutoCAD and eventually becoming hooked on 3D modeling—a journey that led him to advocate for bringing as much technology as possible into the industry. “I was on a quest for realism,” he says. “I knew that by modeling a house before building it, I could show clients exactly what it was going to look like and save them money by eliminating problems before we started building.”
Brock discovered SketchUp, a user-friendly 3D modeling tool offered by Trimble, and in 2011 modeled his first home in 3D. “I was hooked from that point on and literally modeled every project, down to the studs, bolts, and outlets, in 3D,” Brock says. While he considers 3D modeling a great marketing tool, its most important benefit is eliminating costly changes. “It’s an accurate representation of the materials used to build a home, which takes the guesswork out of estimating.”
In addition to his own custom home building business, Brock supports other builders through Constructability 3D by modeling their structures in detail, based on 2D architectural, structural, civil, and MEP (mechanical, electrical, and plumbing) drawings, to identify and avoid issues or clashes.
“Invariably, this saves our [builder] clients thousands of dollars on each project,” he says, by essentially building their structure before they do. “If we have questions, they will have questions.”
Trusses in 3D
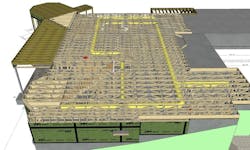
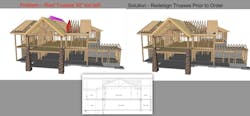
For example, Constructability 3D works with a builder’s truss vendor and imports the actual truss models for their projects into the 3D model. “More often than not, we find significant issues before they become expensive mistakes and delays,” Brock says.
When the 3D model is complete, Brock’s team hosts virtual pre-construction meetings where the architect, structural engineer, truss vendor, lumber supply rep, and any other stakeholders can move around the SketchUp model and visualize the project through all phases of construction, from the footings, foundations and rebar, to the floor systems, wall framing, and roof framing.
Using 3D Models to Identify Common Problems Before the Build
Common problems Brock is able to highlight and address in 3D models include:
- Dimensional discrepancies between architectural drawings and engineered trusses;
- Bearing walls, point load, and continuous loads with no bearing below;
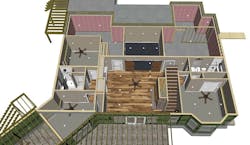
- HVAC issues such as misaligned floor truss duct chases and obstacles for supply and return ducts;
- Toilets and other plumbing drains directly above trusses or specified floor systems;
- Missing details for specific framing-related features;
- Roofing issues not observed in 2D that become obvious in the 3D model.
Collecting Data and Taking the 3D Model to the Field
Most recently, Brock expanded his workflow to incorporate the Trimble RPT600 with FieldLink, a robotic total station and software that accurately measures positions and distances, allowing him and his team at Constructability 3D to generate its own site models.
In the past, this process would have required a surveyor to conduct a topographic study and stake the house corners—a manual task that requires several weeks to verify and complete. “We got tired of having to schedule a few weeks out every time we needed as-built points collected on site, or layout points added in the field,” Brock says. “Not only did it cost thousands of dollars and create huge delays, the ‘nice-to-haves,’ such as documenting utility lines, would cost even more.”
While custom builder John Brock considers 3D modeling a great marketing tool, its most important benefit is eliminating costly changes. “It’s an accurate representation of the materials used to build a home," he says, "which takes the guesswork out of estimating.”
The robotic total station allows Brock to map a detailed topography and pull the data directly into SketchUp as components. From there, he can easily model the terrain. “Using this technology has accelerated the time it takes to build a home while reducing costs and providing accurate site data,” he says, allowing him to develop designs for how the excavated and the proposed design sites will look, which helps him determine costs, such as how much backfill dirt a project will require. “It’s incredibly efficient because my in-house team can provide all of the topographic data we need,” Brock says.
When he did the math comparing the two processes, he found the robotic total station would pay for itself within the first two years of its operation. “Now we have more data than ever and can gather it ourselves at any time,” he says.
When it comes to building, Brock is able to upload the 3D model to FieldLink software on a tablet and stake the house corners themselves versus waiting on (and paying) a surveyor. Not only are the placements for stakes and footings more accurate, he says, “it also allows me to document utility lines for clients and layout wall lines for carpenters, eliminating errors that would be common when using traditional measurement tools.”
Getting Started With 3D
Brock plans to continue pushing the envelope by exploring new ways of using technology in his projects. For builders interested in exploring 3D, Brock has a suggestion: “Start with a simple project, or portion of a job, and practice,” he says. “YouTube videos, which are how I learned, are a great resource for getting started.”
Chris Dizon is a customer success manager at Trimble, SketchUp.

