Vented crawlspaces are a good example of an age-old building habit that’s hard to break, but needs to be. Sure, they’ve long been the code-compliant option no matter where you build, but in areas with any noticeable measure of humidity, those vents actually served as gateways for moisture instead of working (albeit passively) to mitigate it. That’s a recipe for mold growth, structural and duct degradation, indoor air quality problems, thermal loss … and the erosion of your profitability and reputation.
Enter the unvented (also called conditioned, sealed, or closed) crawlspace—now an absolute proven best practice for humid climates from Pittsburgh to Atlanta, and a viable option across the country even if your biggest concerns are pest control, frozen pipes, or duct leaks.
Like I-joists and PEX piping, a lack of crawlspace vents cut out of the stem walls may raise eyebrows among less-enlightened homebuyers (and may even surprise your concrete guy), but it’s easy to talk them through it and gain their acceptance.
Why Have a Conditioned Crawlspace?
A conditioned crawlspace is really no different from a properly built dry basement: thermally sealed from the outdoor elements, insulated, and integrated into the home’s HVAC. It also puts your ductwork in conditioned space where it belongs and will perform at its best. (You still need to seal the ducts, though.)
As such, the same air-distribution rules apply in a closed crawlspace as they do to the living spaces above it: a controlled amount of incoming fresh air balanced by a controlled amount of exhaust air, with a measure of humidity control. If you need perimeter drainage, a sump system, and/or radon mitigation, just do whatever’s proper for a basement.
The results, especially in humid climates, include up to 18 percent energy savings and more than 20 percent humidity reduction, according to the U.S. Department of Energy’s Building America research—not to mention mitigating moisture-related problems. In more temperate, dry climates, energy and humidity reductions are less significant, though other benefits emerge.
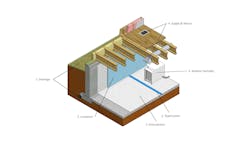
Use the illustration, above, and follow this best-practices checklist to deliver a conditioned crawlspace that offers reliable performance and alleviates the effects of moisture on the structure and indoor environment.
RELATED
- Proper Backfilling and Grading for a Dry Foundation
- When It Comes to Crawlspace Ventilation: Do You Vent or Not?
- VIDEO: The Quarantine Crawlspace: From Mold to Moisture Management
- How to Build a Closed Crawlspace the Right Way
Best-Practices Checklist for a Conditioned Crawlspace
1. Drainage: Regardless of climate, make sure landscape irrigation and rain/snow runoff is properly directed away from the foundation.
2. Ground cover: Install a continuous sealed vapor barrier, such as polyethylene sheeting of at least 10 mil thick, extending up the foundation walls to within 2 inches of the sill plate and sealed around all penetrations passing through it.
3. Insulation: While there are a number of insulation options, consider fastening 2-inch extruded polystyrene (XPS) foam panels along the inside of the perimeter walls from the rim joist with the seams taped. In termite country, local requirements may result in the need for a 6-inch “view strip” or break in the insulation to avoid a continuous path for insects. DO NOT insulate the floor joists.
4. Supply and return air: Located at opposite ends of the crawlspace, the conditioned-air supply and the exhaust-air return registers maintain the proper climatic conditions. The volume of supply air should equal the volume of return air to maintain balanced pressure between the crawlspace and the living spaces above.
5. Humidity control: Integrate dehumidification, if necessary, to maintain a healthy RH level in the crawlspace.
Glenn Cottrell is managing director of the Builder Solutions team at IBACOS.
