We’re seeing more production builders use fiber-cement siding on their homes. It’s an attractive, high-grade exterior cladding that most customers, and some installers, seem to assume is impervious to water. After all, it’s “cement,” right?
Not really. Fiber cement (as the name says) is a blend of cellulose fibers and cement; as such, it will absorb water if you don’t take preventive steps.
Given the high rate of turnover within the trades, however, even crews certified by fiber-cement siding manufacturers often miss the steps required to mitigate moisture that can affect the material. Incorrect detailing can result in water-related damage of fiber-cement claddings from moisture intrusion—a cost to your bottom line and reputation.
Common Fiber-Cement Siding Installation Errors and How to Avoid Them
Fortunately, most of these problems arise from a few common errors that are easy to avoid, including:
Unprimed cuts
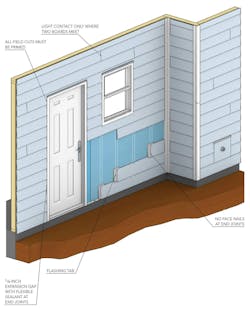
The biggest cause of moisture absorption in fiber-cement siding is failing to prime, paint, or caulk cuts made in the field. Yes, most siding installers would be happy to never touch a can of paint, but the painter’s brush- or spray-applied finish to the surface of the siding won’t seal those unprotected cuts. If they aren’t primed before the fiber-cement siding is nailed to the wall, the board can absorb moisture and swell.
Insufficient roof clearance
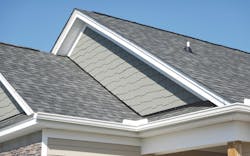
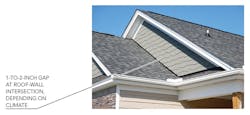
At roof-wall intersections, most trades prefer to leave less than an inch of clearance between the fiber-cement siding and roof shingles to conceal the step flashing behind it. But that’s not enough clearance to prevent water that’s running down the roof during a rain event from coming into contact with the bottom edge of the siding (which, if cut, is usually left unprimed; see above) and working its way into the boards. It’s also too tight to easily replace roof shingles, when needed.
In the South, 1 inch of clearance from shingles is recommended, but in the North, where snow can pile up in that intersection, the best practice is a 2-inch gap. Check with the siding manufacturer for the proper clearance, and don’t forget to prime the cuts!
Gapping and caulking errors
Uncut factory-primed or field-primed cut boards that meet end to end (are butt-jointed) should have light contact, and most manufacturers recommend leaving the joint uncaulked if there’s an aluminum or other durable, noncorrosive flashing tab behind the joint to drain away water. If not, then you should caulk the butt joints to block water intrusion.
End joints at exterior trim are a different story. Where the siding meets a trim board at a window, door, or corner, you need to create an engineered caulk joint consisting of a 1/8-inch expansion and contraction gap filled with a flexible sealant that meets ASTM C920 Class 25 minimum standards. The gap gives the sealant room to flex as the boards move, which prevents the sealant from tearing away from the trim.
Excessive face-nailing
Every face nail is a potential entry point for water, yet some installers insist on face nailing both sides of every butt joint. They worry that the board will cup without the nail. But outside of high-wind zones, that practice is not only excessive and can lead to water intrusion, but it also isn’t aesthetically pleasing.
If a butt joint is slightly kicked out because of inconsistencies in the underlying framing, then it’s fine to use a nail to pull it tighter to the wall. But nailing every joint can make it difficult for the siding to expand and contract, which, ironically, makes it more likely to cup and warp.
Demand and pay attention to these details when installing fiber-cement siding and you’ll mitigate any moisture-related issues.
Tim Kampert drives quality and performance in home building as a building performance specialist of the PERFORM Builder Solutions team at IBACOS.
Access a PDF of this article in Professional Builder's November 2019 digital edition


