You’ve probably heard the term “draftstopping” but perhaps aren’t sure what it means. It sounds like a good idea, right?
Mitigating interior drafts is a theory of good thermal performance and energy efficiency, though we tend to limit our frame of reference to walls and other areas we can see. Those details are critical, no doubt, but they’re also obvious and are usually adequately addressed.
I’m talking about the places that aren’t so obvious—at least once the home is finished: wide swaths of uninsulated or unsealed construction that are often neglected or aren’t considered in the overall scheme of whole-house energy efficiency. You wouldn’t leave a window wide open and expect good thermal performance, so don’t expect a quality thermal envelope without paying close attention to all areas of the wall.
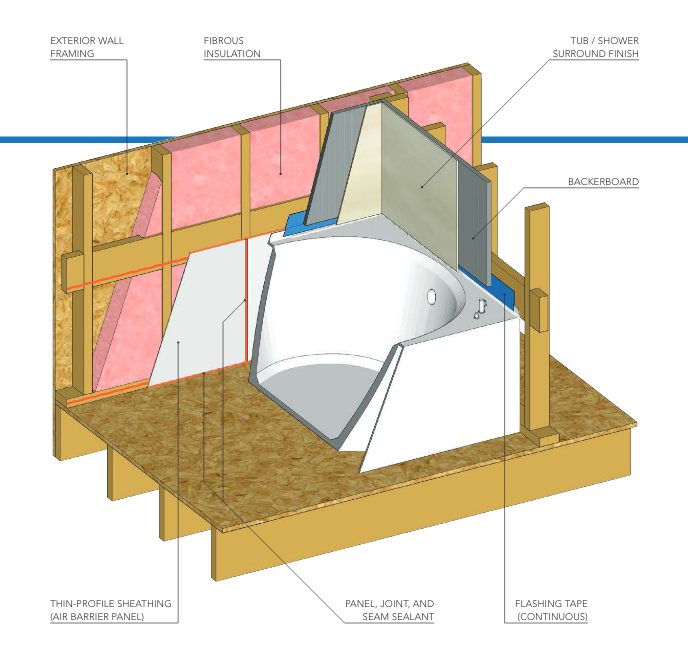
Picture the framing cavities of an exterior wall below the rim of a bathtub, for instance. Because the tub is typically set in place before the insulation crew do their thing, it can be difficult (at best) to effectively insulate, air-seal, and encapsulate that now-hidden wall section.
The same is true for areas behind prefabricated fireplaces, chimneys, and mechanical chases, as well as double-wall and attic knee-wall assemblies. The result? When using fibrous insulation such as fiberglass or cellulose, convective heat transfer can reduce the R-value of those assemblies, their overall thermal efficiency and comfort, and the effectiveness of the HVAC equipment.
The solution is relatively simple, though a different sequence, trade, or both may be needed. Before the cavities and other voids are covered up or made inaccessible by a tub or shower enclosure, chimney flue, or fireplace insert, have the framer or the product installer add insulation and encapsulate it with a rigid, full-height, and completely sealed panel to serve as an air barrier. That kind of assembly renders convective loops far less likely.
Discuss and settle details and performance expectations beforehand with your trades so that everyone knows the drill, and educate and inform your building inspector before he visits the site so he doesn’t red-tag the work or make you tear it out.

1.] Insulation: Fill the entire wall cavity with insulation to the code-compliant (or better) R-value.
2.] Air barrier panel: Cut sheathing material—such as fiber-cement board, paperless or glass-mat drywall, thin-profile sheathing, or rigid insulation—to fit so it covers the entire exterior wall surface behind the tub, and encapsulate the cavity insulation. If necessary, add blocking between the framing members to fully fasten the air barrier.
3.] Air barrier sealant: Apply a thick bead of sealant to the exposed surfaces of the framing members, including the plates and any blocking.
4.] Air barrier fastening: Nail or screw the air barrier material to the framing.
5.] Joint and seam sealant: Apply sealant or expanding foam along joints and to seal seams and any holes made through the air barrier material. Once the tub is installed, seal any holes around the tub drain.
Richard Baker is a program manager on the Builder Solutions team at IBACOS.
