Many builders in cold climates choose to build on basement foundations. If you have no intention of finishing the basement space, the typical damp-proofing and exterior drain system are usually sufficient. But for a warm, dry, comfortable finished basement, additional details must be considered.
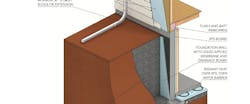
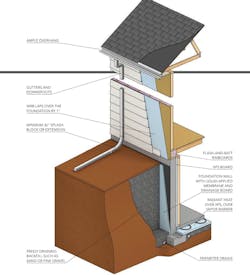
The drawing below shows best-practice details. These start at the roof (with a wide overhang) and extend down to the footing (with a good drainage system). They include surface drainage to keep water away from the foundation and subsurface drainage to ensure that any water that reaches the foundation won’t stay there long enough to be absorbed. (Click to download the PDF at the end of the article to better see the illustration.)
Illustration: courtesy IBACOS
Above grade. The basics here include gutters and downspouts to manage roof runoff, and positive grade that’s sloped away from the house. Avoid garden plantings against the foundation. Every wall assembly must have a properly installed weather resistive barrier (WRB) that is integrated in weatherboard fashion with all the flashing components and laps over the foundation by at least 1 inch.
Foundation damp-proofing vs. waterproofing. A thin layer (about 10 mils) of asphalt coating on the foundation will reduce moisture absorption from damp soil but won’t stop liquid water under hydrostatic pressure. In wet soils, waterproofing is best done by applying a thick (40+ mils) coating of rubberized asphalt, which doesn’t get brittle when cold and can span cracks up to 1/16 of an inch.
As part of waterproofing the foundation wall, apply a thick bead of sealant around pipe penetrations and at the intersection of the foundation wall and footing. Tool the sealant into place to ensure complete coverage and good adhesion.
RELATED
- Concrete Solutions for Lurking Moisture—concrete foundation moisture-proofing and waterproofing
- Moisture-Control Techniques for Wood-Framed Homes
- Proper Backfilling and Grading for a Dry Foundation
Drainable backfill. Letting water sit against the foundation is, obviously, a bad idea. To avoid the potential for hydrostatic pressure against the foundation, install a drain mat or board over the waterproof coating, then backfill with clean sand.
Perimeter drains. Setting the drain tile on the inside and outside of the footing will provide ultimate protection for the slab against high water tables and water seeping into the soil from rain and snow. In regions with low rainfall (below 20 inches per year) and low water tables, installing just an exterior drain tile is sufficient.
Slab protection. In addition to keeping the foundation walls dry, you’ll need to keep the floor slab dry. Best practice here is to place a 4-inch-thick layer of gravel (1/2-inch stones or larger), followed by a robust vapor barrier. Seal this to the top of the footing, and seal all penetrations through it. This not only protects the slab from moisture but can also serve as one of the critical components for a radon mitigation system.
MORE INFO: Do Concrete Slabs Really Need Welded Wire Mesh?
Insulation. When finishing a basement, rigid board (polyiso or XPS) performs better than fiberglass batts. Install a sufficient thickness to meet or exceed code requirements. The rim joist can be insulated using a flash-and-batt method: Apply 2 inches of closed-cell spray foam to the rim joist to reduce the potential for condensation, followed by fiberglass batts.
Mechanicals. Besides properly detailing the foundation, the best thing you can do to keep that below-grade space (and the rest of the home) comfortable is to properly size the HVAC. An oversized unit won’t run long enough to fully dry the air in humid climates, a problem that’s most noticeable in the basement.
The most comfortable heating technology for basements is hydronic radiant heating in the slab. This is ideal for climates where cooling isn’t considered necessary. When doing in-slab radiant heating, it’s important to install at least 2 inches of XPS foam insulation under the heating lines, below the slab, and on top of the vapor barrier. This helps to drive the heat toward the conditioned space.
Graham Davis drives quality and performance in home building as a building performance specialist of the Perform Builder Solutions team at IBACOS.

