Flashing in a brick veneer wall serves the same purpose as any other flashing: It must shed water to the outside before that water can reach the framing. Unfortunately, some contractors have lost sight of that goal.
The long-term consequences of poorly detailed through-wall flashing can range from rusted steel lintels to framing rot. These problems can take years to become visible, by which time the builder may have an expensive fix to deal with.
During my site assessments, I’ve found recurring errors with brick veneer flashing. Here are the most common, along with advice on how to do the job right.
Most Common Errors With Brick Veneer Flashing
Missing through-wall flashing
It’s not uncommon to see masons neglect to install flashing above window and door openings. Those I’ve spoken with seem to assume that because there’s flashing at the base of the wall, water that gets in will eventually drain out at the base. While that assumption may be technically true in some cases, relying on it is asking for trouble.
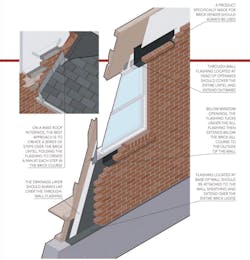
One problem is that brick veneer, like stone and stucco, is a reservoir cladding. It absorbs water and can release moisture to the wall surface behind the cladding via solar drive. That makes quick drainage a must. As shown in the illustration, opposite, through-wall flashing needs to be installed at windows, doors, and other wall openings, as well as at transitions in rooflines.
In the case of a lintel, the flashing should cover the entire metal surface, extend across the air space behind the brick, and be integrated into the water resistive barrier (WRB). In certain areas, such as rake roof interfaces, brick through-wall flashing needs to be stepped above the lintels and should have end dams integrated into the vertical mortar joint, which allows for the water to immediately exit the brick.
RELATED
- Avoid Water Intrusion and Leaks: Penetration Flashing Done Right
- Sill Flashing With a Water-Resistive Barrier
- Proper Flashing for Recessed Windows
Reverse lapping
For a wall to shed water, the flashing must be properly integrated into the WRB. With housewrap, the installer must attach the flashing to the wall sheathing and then lap the housewrap over it, shingle-style. At the base of the wall, installers generally get this right, but further up, they often place the flashing over the housewrap. This creates a reverse lap, which is like installing clapboards upside down.
Some installers reason that because the flashing is behind the brick veneer and sees little bulk water, adhesive tape will be good enough. Not so. Adhesive tape can fail. Water may eventually work its way through and can seep into the wall system. If a face-sealed tape is necessary, the selection should be compatible with the drainage layer and assembly.
Improper flashing materials
The third mistake I often see is materials used as flashing that aren’t made for that purpose. These include polyethylene sheeting, asphalt building felt, and non-UV–resistant PVC waterproofing membrane. These materials are easily damaged during construction and can degrade when exposed to sunlight. Exposure during construction can make the sheet brittle and it may crack after just a couple of years. Polyethylene sheeting, for example, can’t withstand brick installation practices.
Use only flashings made for brick veneer. Most adhesive-type through-wall flashings are butyl products (although you can also get rubberized asphalt flashings) and are formulated for compatibility with masonry, mortar, or steel. Copper is also an excellent choice for brick flashing. In addition, there are flashings that rely on mechanical connections through a shingling effect that are specifically designed to hold up to the rigors of masonry wall cladding.
Tim Kampert drives quality and performance in home building as a building performance specialist for the PERFORM Builder Solutions team at IBACOS.

