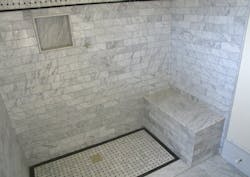
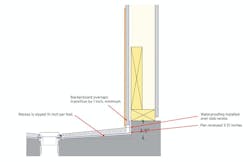
Most luxury and move-up production homes have tiled showers in the owner’s suite bathroom. Those with curbed entries are common, but curbless installations—where the shower floor is flush with the bathroom floor, then slopes to a drain at center or along the back of the stall—are gaining popularity.
As with any shower, leaks are most common at the pan; in the case of a custom shower, the pan tends to be fabricated on site and finished with ceramic tile or a similar hard-surface material.
The details needed to deliver a leak-free installation depend on whether the shower pan is fabricated and finished over wood subflooring or a concrete slab.
RELATED
- Shower Waterproofing, Part 1: Preformed Pans
- Waterproofing Showers, Part 3: Glass Mat Backer Board
- Checklist: The Best Way to Seal a Shower
- Preventing a Common Home-Building Woe: Water Intrusion
Shower Waterproofing: Tiling Over a Wood Subfloor
With wood subflooring, the least expensive option is to use dry-pack mortar to slope the shower floor to the drain, then cover it with an EPDM rubber waterproofing membrane.
But in my experience, this type of installation is the mostly likely to develop leaks. That’s mainly because the membrane has to be folded at the corners so it won’t funnel water behind the tile. Unfortunately, that’s a tough detail to get right in waterproofing the shower floor.
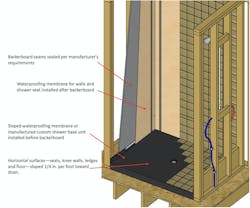
Shower waterproofing problems like these are why the tile contractors working for most of our builder clients use a prefabricated shower base, such as the Schluter-Kerdi system, among others—a polystyrene tray that slopes to the drain with a waterproofing membrane for the tray and waterproofing elements specifically designed for the edges and corners.
The tile contractor then applies unmodified thin-set mortar directly to the membrane, followed by ceramic or stone tile—all of which is outlined in detailed instructions from the pan manufacturer.
Regardless of which approach you take, the waterproofing membrane is always installed before the drywall or backerboard is placed on the shower walls. As a result, we often see screws dropped on the membrane that have (or will be) stepped on, creating holes that lead to leaks into the pan ... and to the wood substrate below it.
We recommend laying plywood or OSB over the membrane to protect it until the floor is ready to tile. But keep an eye on that panel “walking away” to serve another purpose on the jobsite.
Tiling Over Concrete
A prefabricated shower base also works well over a concrete substrate, but some builders prefer to save the expense by specifying that the tile be applied directly to the slab. If you take this approach, make sure to seal the surface of the slab recess first with an elastomeric waterproofing and crack-prevention membrane. Applying it with a brush or roller will ensure good adhesion and prevent cracks that develop in the concrete from telescoping to the tile.
A waterproofing membrane over a concrete substrate also mitigates moisture absorbed by the unsealed concrete from making its way to the area beneath the bathroom floor, causing problems with that surface. We have also seen this moisture cause swelling and delamination at the bases of vanities set on the slab and finished trim.
Tim Kampert drives quality and performance in home building as a building performance specialist of the PERFORM Builder Solutions team at IBACOS.


