The How Behind the Wow of The New American Home 2019
There’s no question that buyers expect a baseline of performance in a new home: floors that don’t squeak or feel cold, windows and patio doors that don’t rattle in the wind, toilets and roofs that don’t leak.
That expectation is so ingrained that buyers rarely think about those things while they walk your just-built homes, and there’s no good reason for you as their builder to bring it up during the tour.
Not when you’d rather (and rightly) want buyers to ooh and aah over the kitchen appliances, bath fixtures, and large expanses of windows and patio doors that ideally inspire a flawless image of living there.
But that doesn’t mean you neglect what’s behind all those wow factors. In fact, just the opposite, because giving that stuff short shrift during construction will eventually shatter the perfect picture in your buyer’s mind once they move in … and likely take a bite out of your profit margin for warranty work, not to mention dinging your reputation and referrals.
Dan Coletti and his team at Sun West Custom Homes, in Las Vegas, intrinsically understand the relationship between “wow” and “how.”
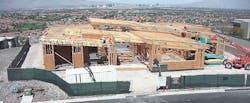
As the designer/builder of The New American Home 2019, Sun West has created ample opportunities to impress in this 8,200-square-foot desert contemporary house. But the team also took great care to deliver high-performance systems behind the finishes, even if the eventual homeowners never notice—in fact, that’s the goal.
We selected a handful of “how” factors to share, providing technical insight and insider tips that reveal the story behind the home’s wow factors that define its superior performance, comfort, and convenience.
This is the first in a series of articles about The New American Home (TNAH) 2019. Look for feature coverage of the finished home in the February 2019 issue and a closer look at the home’s kitchens and bathrooms in the March 2019 issue. Also visit the TNAH website at tnah.com for more information about the project, sponsors, key products, and free guided tours of the home during the 2019 International Builders’ Show, Feb. 19-21, in Las Vegas.
Patio Door Structure
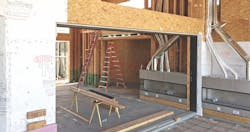
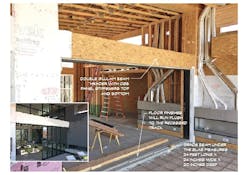
What it is: A combination of an under-slab grade beam, a double-glulam header with plywood stiffeners, and a steel box moment frame supporting a five-panel, aluminum-frame, telescoping and pocketed patio door.
What it does: The concrete grade beam is designed to carry the vast majority of the door’s total weight (or load; about 1,000 pounds) while the header assembly and moment frame resist lateral wind forces to help ensure consistently smooth operation anywhere along the door’s 20-foot track.
Installer insight: “With a grade beam under the slab, you can size your header to manage only the lateral forces,” says structural engineer Clair Stewart, president of CS Design Group, in Las Vegas. Asking the header to also carry the door’s weight, he says, is a recipe for racking and rattling the door system.
Big question answered: Only the outside header is load-bearing to supplement the grade beam and carry any loads from above. The moment frame enables narrower walls on either side of the expanse to optimize the rough opening dimensions and achieve the design intent.
Little-known fact: Stewart used the building code’s more stringent wind-load calculation for claddings to help size the header assembly against lateral loads and deflection.
Specs: Western Window Systems Series 7000 Multi-Slide Door; locally sourced glulam beams and other structural components.
Wall and Ceiling Insulation
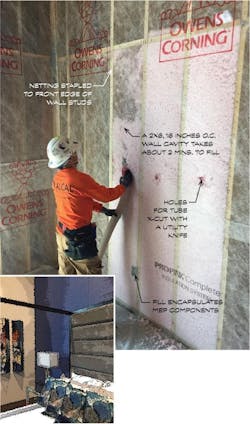
What it is: A net and blow (aka blown-in-blanket or BIB) insulating system for the perimeter framed walls and ceilings. It employs loose-fill fiberglass insulation held in the framing cavities by a fibrous netting stapled to the face of the wall studs and bottom of the roof truss cords.
What it does: Delivers insulating coverage and air-sealing value (less than 2 air changes per hour) by completely filling the framed cavities and fully encapsulating any MEP elements, such as wiring, pipes, and junction boxes. Achieves R-23 in a 2x6 wall cavity and R-38 ceilings.
Installer insight: “We typically staple the netting every ¼ or ½ inch to make sure it’s tight to the framing,” says Darren Johnson, an estimator with Alcal Specialty Contracting, the local installer, even though 1-inch spacing is acceptable. The netting is strong enough to avoid sagging and contain the insulation at the holes cut for the blow-in tube.
Big question answered: Unlike blown-in cellulose, the fiberglass will not settle due to gravity or other forces over time, maintaining full cavity coverage.
Little-known fact: Ceilings in the home are insulated all the way to the roof deck—in one case more than 3 feet for an estimated insulating value of R-100. Sun West also used an aerosol-applied sealant to encapsulate tiny breaches in the wall assembly, further reducing thermal transfer through the structure.
Specs: Owens Corning ProPink L77 Loosefill fiberglass insulation; Aeroseal’s AeroBarrier aerosol envelope sealing system.
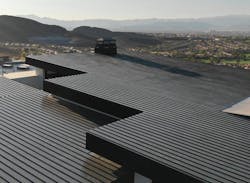
Sloped Metal Roof Assembly
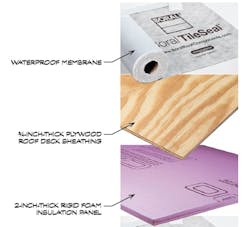
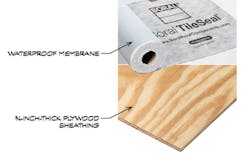
What it is: From the plywood roof deck, an assembly of self-adhered, modified asphalt waterproofing membrane; 2-inch-thick XPS rigid-foam insulation; ¾-inch plywood; and another layer of waterproof membrane under the standing-seam metal roof panels.
What it does: Provides the required R-38 insulating value and a water/moisture barrier for the home’s sloped roof areas, as well as the necessary rigidity to maintain the metal roof panels’ structural integrity.
Installer insight: Sun West and Prestige Roofing, the local installer, originally intended to use a 4-inch-thick mineral wool insulation layer, but it proved too spongy for the metal roof. “The XPS board is half that thickness but much more dense and rigid,” says Brett Romney, an estimator with Prestige. To be extra safe, Romney’s crew installed a waterproof membrane over the plywood roof deck as a second barrier to mitigate moisture that might get behind the metal roof panels and the plywood-membrane assembly directly under it.
Big question answered: Code typically requires a 3:12 minimum slope for a metal roof to enable adequate water runoff and mitigate ice damming. But since Las Vegas averages only about 4 inches of rain per year and rarely gets snow or sustained ice, the city allowed the 1 ½:12 slope Sun West wanted.
Little-known fact: Had Sun West used spray foam insulation on the underside of the roof deck, it’s unlikely the metal roofs would have required an insulating layer above the deck.
Specs: Boral TileSeal HT underlayment; Owens Corning Foamular 250 extruded polystyrene (XPS) rigid foam insulation panels; Berridge Manufacturing Tee-Panel standing-seam metal roof panels; locally sourced plywood.
In-Wall Toilet Tank and Drain System
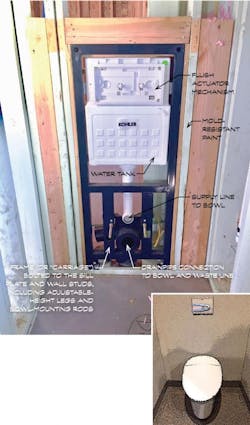
What it is: A one-piece, thin-profile toilet tank and drain system designed to fit within a 2x6 or larger wall cavity. The bowl cantilevers from the wall, leaving the floor underneath clear. A flush actuator mounts on the wall above the bowl.
What it does: Enables a smaller water closet footprint, affording more square footage for the rest of the bathroom. The cantilevered bowl also makes it easier to clean the floor.
Installer insight: Leave a 12-inch perimeter around the location of the waste drain rather than pouring the slab right up to it, advises Levi Unruh, a senior drafter with Canyon Plumbing, the local installer. “It’s a very tight tolerance to line up the drain run within the wall cavity,” he says, “and it’s easier to adjust the wall framing than the poured concrete.”
Once the in-wall tank is installed and the drain components connected, fill the void around the drain to complete the slab. Also, consider setting the bowl an inch or so higher than recommended, as it will otherwise appear oddly low (if not actually so) once finished.
Big question answered: For service work, remove the bowl to access the drain and the flush actuator to reveal the water supply line and shutoff valve.
Little-known fact: The metal frame that holds the plastic tank and drain system is called a “carriage” or “carrier” and is bolted to the floor plate and flush to the trimmer studs within the wall cavity.
Spec: Kohler Veil series in-wall tank and carrier system.
Perimeter Slab Insulation
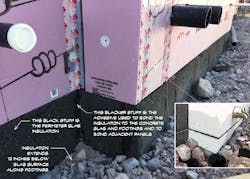
What it is: A dense, 3-inch-thick insulating material surrounding the footprint of the home’s slab foundation that is bonded to the slab edge and footing below (and also bonds adjacent insulation panels) using a two-part adhesive.
What it does: Buried 12 inches below grade along the face of the footing and running flush to the top of the 4-inch slab, the system is designed to maintain the natural thermal mass qualities of the concrete and the overall indoor comfort of the home.
Installer insight: “Install it as soon as you strip the forms from the slab and footings,” says Adam Kiefer, general manager at Elite Construction Services, the local installer, so that the material extends to the full depth of the footings, optimizing its thermal benefits. Also, because the adhesive was the consistency of honey, Kiefer had his crew trowel it onto the concrete and then stick the panels to it—an easier process, under the circumstances, than applying the adhesive to the insulation first.
Big question answered: The dense but lightweight material is formulated to resist degradation and pest infestation so it maintains its insulating value over time. Adds Kiefer: “It took a bit of abuse on the jobsite and it still held up well.”
Little-known fact: Owens Corning acquired the product when it purchased insulation manufacturer Pittsburgh Corning in 2017. This is its first U.S. residential application.
Specs: Owens Corning Foamglas HLB 800 insulation; PC 88 adhesive.
